online retailer,bulk & wholesale and OEM/ODM e-shop of light decoration")


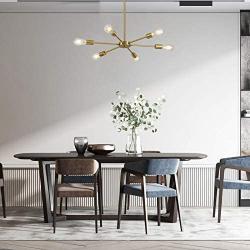
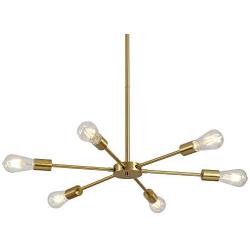
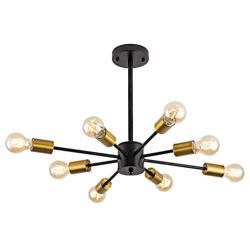
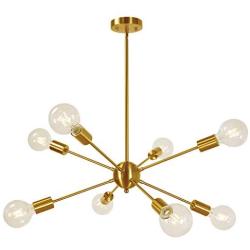
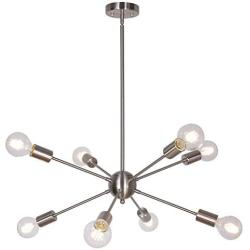
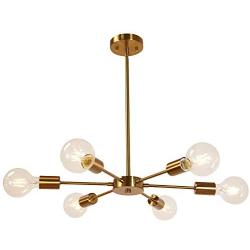
MELUCEE Sputnik Chandelier Brass 8 Lights, Semi Flush Mount Ceiling Light Mid Century Modern Pendant Light for Foyer Dining Room Bedroom Restaurant
About this product
*✔EASY TO INSTALL: All arms are pre-wired, just need to screw each arm into the center disc and thread the main wire through the extension rods, then install the light fixture into a ceiling box.
*✔ANGLED CEILINGS:This sputnik chandelier with a durable swivel could be mounted on vaulted or angled ceilings.
*✔ADJUSTABLE:This 8 lights sputnik chandelier comes with 4 Rods(1 rod=10 inch) to adjust the hanging length follow your mind.
*✔BULBS TYPE: LED/CFL. Per Bulb Wattage : Max 60W. Bulb Base: E26 Bulbs. Number of Bulb: 8 Bulbs (★Bulbs NOT Included)
*✔DIMMABLE:Could be fully dimmable when used with dimmable bulbs and compatible dimmer switch to create the perfect atmosphere.
Description
Sputnik Chandelier Brass 8 Lights, Semi Flush Mount Ceiling Light Mid Century Modern Pendant Light for Foyer Dining Room Bedroom Restaurant UL Listed by MELUCEE
SPECIFICATIONS
Style:8 lights brass modern sputnik chandelier
Material: Metal
Color: Brass
Bulb Type: LED/CFL
Per Bulb Wattage:Max 60W
Bulb Base: E26 Bulbs
Number of Bulb: 8 Bulbs (Bulbs not included)
Voltage: 110-120V (U.S. standard line voltage)
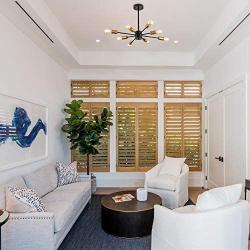
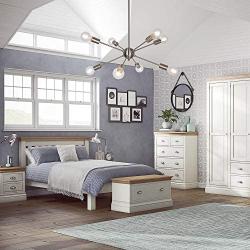
Suitable Scenes:8 heads sputnik chandelier enough to light up general indoor areas.It is perfect for Living Room, Bedroom, Kitchen, Dinning room, Corridor, Cafe, Basement, Bar, Club, Restaurant, Library,and Reading Room.
PACKAGE INCLUDED
1 x Modern Sputnik Chandelier(Bulbs not included)
EASY INSTALLATION
Step 1.All arms are pre-wired, screw in each arm into the center disc and thread the main wire through the extension rods.
Step 2.Marked the location of the installation.Use a hole puncher to punch.
Step 3.Insert the screw holder to the wall.
Step 4.Use short screws to fix metal plate to the round base.
Step 5.Use long screws to fix the round base to wall. Done.
NOTE
1.Do not connect electricity until your fixture is fully assembled.
2.Due to differences between monitor displays, actual color may vary slightly from image.
3.Please feel free to contact us any time if you have any question,we will try our best to help you solve all problems.
Frequency Asked Questions
What is lightdecor.net?
Light Decor is a ready-to-ship (RTS) online retailer and OEM/ODM e-shop of light decoration, commercial lighting, industrial lighting, decorative lamp, holiday lighting, indoor lighting, outdoor lighting, solar lighing, landscape lighting, lighting bulb and tube, and lighting accessories. All high quanlity products are manufacturered by Wegner Technology Limited.
What service can be supported from lightdecor.net?
lightdecor.net offer product order and product customization service.
- OEM/ODM services (provide sketches or ideas),
- Pantone color matching & logo printingm,
- custom gift boxing with private labeling
How to order products from lightdecor.net?
You can online order product from lightdecor.net by adding product to cart and got to checkout page. Multiple currency options are supported. You can choose suitable currency to place order. Before checkout, you should register account to submit order information.
How to delivery your order from lightdecor.net to you?
For order delivery, lightdecor.net provides three shipping options, express, air-flight and sea freight. You can choose one option according to your order.
How to inquiry product bulk price?
For the interested product, you can submit bulk price inquiry by bulk order inquiry form.
Related Products